anderkart
Moderator
Here's a video that will help you disassemble and clean your Honda GX200/6.5hp. clone carb, and get a little better understanding how these carburetors function:
http://www.youtube.com/watch?v=q5zbEbq1KX8
The basic way a carburetor works is:
As air is drawn in through your air cleaner and the carbs Venturi, the vacuum that's crated inside the carb siphons/draws fuel (in from the float-bowl), through a very small orifice (hole) in the center of your Main-jet and Emulsion tube, and through the Idle-Jet. This fuel is then simply atomized/blended with the incoming air to make your engine start and run.
(that vacuum of air entering your carb is created by the engines piston going down on its Intake-Stroke)
Its very common for the little orifice's in the Main Jet (and Idle-jet, and Emulsion-tube) to become plugged up with dirt, varnish and rust, resulting in the engine to be difficult to start or not run at all.
The Main Jet (and Emulsion tube/Idle-Jet) can be cleaned by removal and poking them out with a very small piece of wire. And then also following this up with spraying aerosol Carburetor Cleaner (with the straw on the cans nozzle) through all of their tiny orifices.
Be very careful you dont accidentally spray any carb cleaner in your eyes!!! Wear safety glasses for this step!!!)
Here's some pics of (GX200/6.5hp. clone) Main jets and the Emulsion tube:


___________________
Below is an exploded-view diagram of a GX200/6.5hp-clone carburetor:
(the main jet is Item #35 on this diagram below)
Many other brands of 4-cycle go kart engines have carburetor's that are fairly similar to this Honda GX200 design.
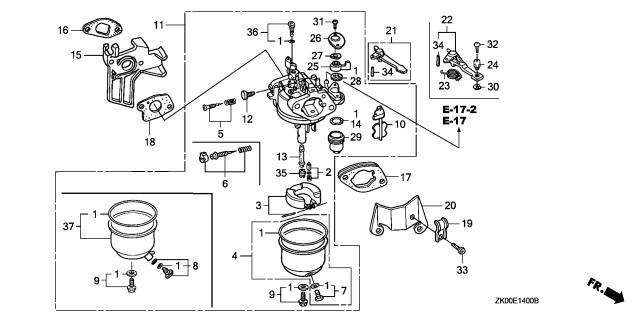
#1 - GASKET SET (Honda part# 3477171)
#2 - VALVE SET, FLOAT (Honda part# 1441476)
#3 - FLOAT SET (Honda part# 1441492)
#4 - CHAMBER SET, FLOAT (Honda part# 2455608)
#6 - SCREW SET, PILOT (Honda part# 4219879).
#7 - SCREW SET, DRAIN (Honda Code 1672187)
#9 - SCREW SET (Honda part# 1441518).
#10 - CHOKE SET (Honda part# 1441526).
#11 - CARBURETOR ASSY. (Honda part# 5148093).
#12 - SCREW, THROTTLE STOP (Honda part# 1441559)
#13 - EMULSION-TUBE/NOZZLE, MAIN (Honda part# 4743035)
#14 - GASKET, FUEL STRAINER CUP (Honda Code 0005652)
#15 - INSULATOR, CARBURETOR (Honda part# 4743068)
#16 - GASKET, INSULATOR (Honda part# 3683547)
#17 - SPACER, CARBURETOR (Honda part# 2534055)
#18 - GASKET, CARBURETOR (Honda part# 4725289)
#21 - LEVER, CHOKE (STD) (Honda part# 1440114)
#25 - LEVER, PETCOCK (Honda part# 5140876)
#26 - PLATE, LEVER SETTING (Honda part# 5148135)
#27 - SPRING, PETCOCK LEVER (Honda part# 1807809)
#28 - GASKET, PETCOCK (Honda part# 3440708)
#29 - CUP, FUEL STRAINER (Honda part# 1441583)
#31 - SCREW, PAN (3X6) (Honda part# 0561654)
#34 - PIN, SPRING (2X12) (Honda part# 1441591)
#35 - JET, MAIN (#70) (Honda part# 8832347)
___________________
Its also very common for dirt, rust and varnish to cause major trouble in the carburetors Needle and Seat valve.
Symptoms such as flooding or no fuel in the float bowl will many times be fixed by simply cleaning your needle and seat valve and its related orifices in the carbs main body.
The picture below is a Needle valve: (Its #2 on the illustrated carb diagram above)
The carbs float senses the float-bowl's fuel level, and operates this little valve to either open or closed positions allowing fuel to enter the carb and maintain the correct fuel-level in the float-bowl.

__________________
When your carb is disassembled, try to carefully spray out every single tube, orifice and part of the carb to make sure everything is clean and nothing is still plugged up with dirt, rust or varnish.
If your careful, (and lucky) you can usually re-assemble your carb with the same old gaskets, seals and float bowl O-ring. But not always, sometimes the Float Bowl O-ring becomes hardened or cracked, and it wont ever make a good seal again after being disassembled for cleaning your carb.
If your carbs mounting Gasket falls off, make sure you reinstall it correctly. Its possible to install some upside down where it still fits on, but cant make a seal.
__________________
When we buy gas at a station, it commonly pumps dirt, crap and water/moisture right into our fuel tanks or gas cans.
And then on top of that, lots of karts are either stored outside, or with partially filled tanks in humid conditions where steel fuel tanks (and gas-cans) will rust, thus sending dirt and rust on its way to our nice clean carbs.
Storing your kart (or metal gas can) with either a completely full, or completely empty/well-vented tank will help keep metal fuel tanks from ever rusting in the first place. Because high Humidity levels will cause moisture to condense inside and eventually cause rust.
And If your letting rain somehow get into into your fuel tank or gas can, you deserve all the problems that will result.
So unless there's some type of really good fuel filter used, everyone is just setting themselves up for dirty carb problems to happen over and over and over again !!!
______________________
Dirty carb issues seem to be the most commonly reported problems with Tecumseh specifically, but also all brands of small engines here on DIY.
So I just think everyone needs to be more aware they need to clean and flush their fuel tanks/lines, and also install an additional high quality, In-line fuel filter at the same time the carb is cleaned. (or preferably before problems ever arise...)
I realise some engines like older Briggs have tank mounted carbs, but their tanks can be cleaned/flushed out and fuel strainers can be cleaned/replaced too.
My gas can is plastic and has a very fine-micron screen built into it's spout. And then I also store the gas can, and my kart in the garage with a completely empty fuel tank, lines and carb. I also replace my karts in-line fuel filter often and with the highest quality filter available.
So as a result, I've never once had dirty carb problems with my Tecumseh or any of my other engines.
______________________
Does anyone know if all Tecumseh engines originally came with a factory installed fuel filter or some type of strainer screen?
If they do, It must not work very well... Either that or lots of guys just neglect to replace or clean it out so these dirty carb problems dont just happen all over again.
_______________________
Also: simply using a product like Sta-bil:--> http://www.i4at.org/surv/sta-bil.htm
Will help keep your gas from going bad causing you all kinds of similar problems.
Lots of guys just dont seem to realise how fast our modern gasoline can start to go bad nowadays. It doesn't take very long...
__________________________
We all just need to be more aware of these issues and help pass the word on to newbies here on DIY
Our slogan could be: Its a whole lot easier to keep it out now, than clean it out later!"
http://www.youtube.com/watch?v=q5zbEbq1KX8
The basic way a carburetor works is:
As air is drawn in through your air cleaner and the carbs Venturi, the vacuum that's crated inside the carb siphons/draws fuel (in from the float-bowl), through a very small orifice (hole) in the center of your Main-jet and Emulsion tube, and through the Idle-Jet. This fuel is then simply atomized/blended with the incoming air to make your engine start and run.
(that vacuum of air entering your carb is created by the engines piston going down on its Intake-Stroke)
Its very common for the little orifice's in the Main Jet (and Idle-jet, and Emulsion-tube) to become plugged up with dirt, varnish and rust, resulting in the engine to be difficult to start or not run at all.
The Main Jet (and Emulsion tube/Idle-Jet) can be cleaned by removal and poking them out with a very small piece of wire. And then also following this up with spraying aerosol Carburetor Cleaner (with the straw on the cans nozzle) through all of their tiny orifices.
Be very careful you dont accidentally spray any carb cleaner in your eyes!!! Wear safety glasses for this step!!!)
Here's some pics of (GX200/6.5hp. clone) Main jets and the Emulsion tube:
___________________
Below is an exploded-view diagram of a GX200/6.5hp-clone carburetor:
(the main jet is Item #35 on this diagram below)
Many other brands of 4-cycle go kart engines have carburetor's that are fairly similar to this Honda GX200 design.
#1 - GASKET SET (Honda part# 3477171)
#2 - VALVE SET, FLOAT (Honda part# 1441476)
#3 - FLOAT SET (Honda part# 1441492)
#4 - CHAMBER SET, FLOAT (Honda part# 2455608)
#6 - SCREW SET, PILOT (Honda part# 4219879).
#7 - SCREW SET, DRAIN (Honda Code 1672187)
#9 - SCREW SET (Honda part# 1441518).
#10 - CHOKE SET (Honda part# 1441526).
#11 - CARBURETOR ASSY. (Honda part# 5148093).
#12 - SCREW, THROTTLE STOP (Honda part# 1441559)
#13 - EMULSION-TUBE/NOZZLE, MAIN (Honda part# 4743035)
#14 - GASKET, FUEL STRAINER CUP (Honda Code 0005652)
#15 - INSULATOR, CARBURETOR (Honda part# 4743068)
#16 - GASKET, INSULATOR (Honda part# 3683547)
#17 - SPACER, CARBURETOR (Honda part# 2534055)
#18 - GASKET, CARBURETOR (Honda part# 4725289)
#21 - LEVER, CHOKE (STD) (Honda part# 1440114)
#25 - LEVER, PETCOCK (Honda part# 5140876)
#26 - PLATE, LEVER SETTING (Honda part# 5148135)
#27 - SPRING, PETCOCK LEVER (Honda part# 1807809)
#28 - GASKET, PETCOCK (Honda part# 3440708)
#29 - CUP, FUEL STRAINER (Honda part# 1441583)
#31 - SCREW, PAN (3X6) (Honda part# 0561654)
#34 - PIN, SPRING (2X12) (Honda part# 1441591)
#35 - JET, MAIN (#70) (Honda part# 8832347)
___________________
Its also very common for dirt, rust and varnish to cause major trouble in the carburetors Needle and Seat valve.
Symptoms such as flooding or no fuel in the float bowl will many times be fixed by simply cleaning your needle and seat valve and its related orifices in the carbs main body.
The picture below is a Needle valve: (Its #2 on the illustrated carb diagram above)
The carbs float senses the float-bowl's fuel level, and operates this little valve to either open or closed positions allowing fuel to enter the carb and maintain the correct fuel-level in the float-bowl.
__________________
When your carb is disassembled, try to carefully spray out every single tube, orifice and part of the carb to make sure everything is clean and nothing is still plugged up with dirt, rust or varnish.
If your careful, (and lucky) you can usually re-assemble your carb with the same old gaskets, seals and float bowl O-ring. But not always, sometimes the Float Bowl O-ring becomes hardened or cracked, and it wont ever make a good seal again after being disassembled for cleaning your carb.
If your carbs mounting Gasket falls off, make sure you reinstall it correctly. Its possible to install some upside down where it still fits on, but cant make a seal.
__________________
When we buy gas at a station, it commonly pumps dirt, crap and water/moisture right into our fuel tanks or gas cans.
And then on top of that, lots of karts are either stored outside, or with partially filled tanks in humid conditions where steel fuel tanks (and gas-cans) will rust, thus sending dirt and rust on its way to our nice clean carbs.
Storing your kart (or metal gas can) with either a completely full, or completely empty/well-vented tank will help keep metal fuel tanks from ever rusting in the first place. Because high Humidity levels will cause moisture to condense inside and eventually cause rust.
And If your letting rain somehow get into into your fuel tank or gas can, you deserve all the problems that will result.
So unless there's some type of really good fuel filter used, everyone is just setting themselves up for dirty carb problems to happen over and over and over again !!!
______________________
Dirty carb issues seem to be the most commonly reported problems with Tecumseh specifically, but also all brands of small engines here on DIY.
So I just think everyone needs to be more aware they need to clean and flush their fuel tanks/lines, and also install an additional high quality, In-line fuel filter at the same time the carb is cleaned. (or preferably before problems ever arise...)
I realise some engines like older Briggs have tank mounted carbs, but their tanks can be cleaned/flushed out and fuel strainers can be cleaned/replaced too.
My gas can is plastic and has a very fine-micron screen built into it's spout. And then I also store the gas can, and my kart in the garage with a completely empty fuel tank, lines and carb. I also replace my karts in-line fuel filter often and with the highest quality filter available.
So as a result, I've never once had dirty carb problems with my Tecumseh or any of my other engines.
______________________
Does anyone know if all Tecumseh engines originally came with a factory installed fuel filter or some type of strainer screen?
If they do, It must not work very well... Either that or lots of guys just neglect to replace or clean it out so these dirty carb problems dont just happen all over again.
_______________________
Also: simply using a product like Sta-bil:--> http://www.i4at.org/surv/sta-bil.htm
Will help keep your gas from going bad causing you all kinds of similar problems.
Lots of guys just dont seem to realise how fast our modern gasoline can start to go bad nowadays. It doesn't take very long...
__________________________
We all just need to be more aware of these issues and help pass the word on to newbies here on DIY
Our slogan could be: Its a whole lot easier to keep it out now, than clean it out later!"
