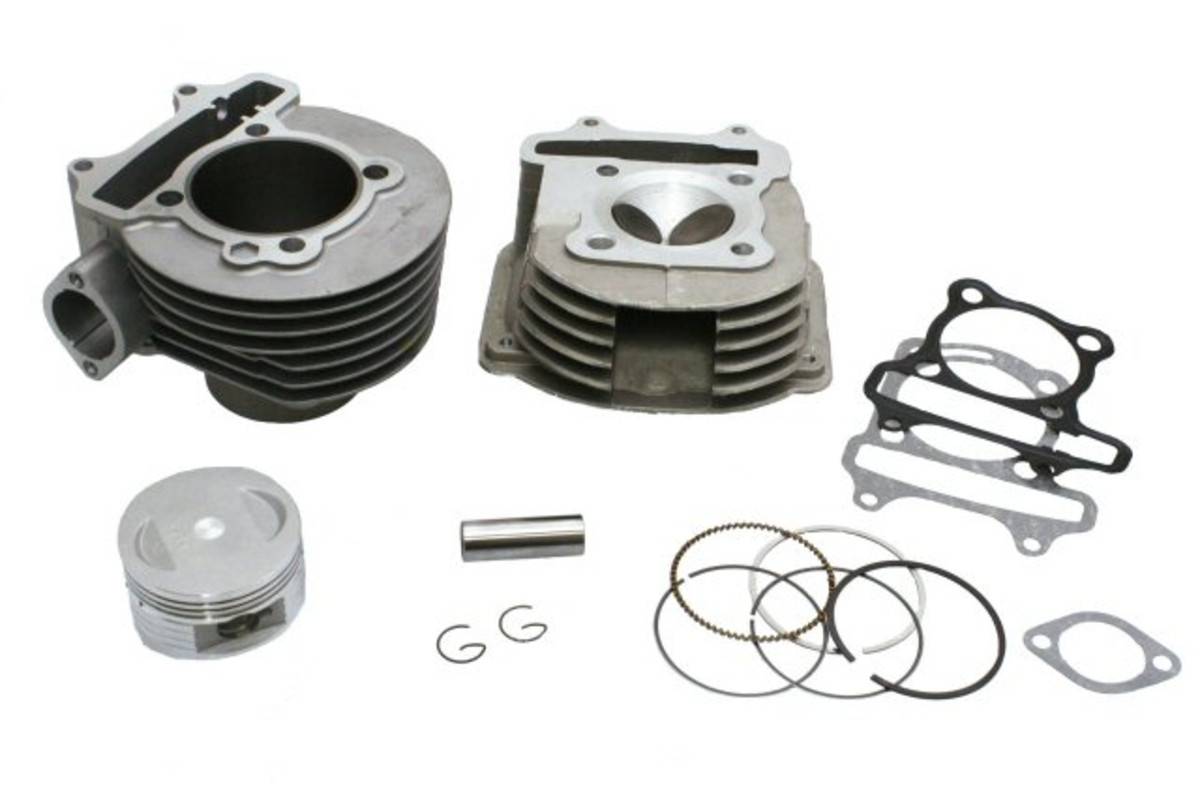
Tomberlin Crossfire 150 Rebuild

subydrift

Member
Messages
42
Reaction score
68
Location
South Jordan, UT
The steering is actually 100% original except the outer tie rod ends. The rack is original (rebuilt) and its mounting is original also. Hoping to get the steering wheel mounted this weekend and see how it works. The rack turns effortlessly with your fingers and steering wheel shaft spins freely also so it should be easy for smaller arms. I made a small goof and welded the hood panel mount right where the steering shaft mount sits so I'll have to work that area out.
 
Last edited:

subydrift

Member
Messages
42
Reaction score
68
Location
South Jordan, UT
I got some body panels dry fit and all the steering and rear brake installed. The panels will all get powder coated orange. Passenger seat is mounted and I’m working on the driver seat. The sliders I got basically make it a custom install so I’m having to do some fab work to get them in right.
71D93ECE-88E5-4891-879E-B16D79258F4C.jpeg
0ED51F5A-CFEF-4C1D-AFE5-ED3A3665DE96.jpeg
C5EE4F35-0891-4B0A-9EB3-6D1901D759C9.jpeg
 

subydrift

Member
Messages
42
Reaction score
68
Location
South Jordan, UT
Fun update here! I got the driver seat fab work all done, got the sliders mounted and the seat installed! The sliders work great and offer the perfect amount of adjustment to get my son up close enough to reach the pedals but then I can slide it all the way back and still feel comfortable. The orange harnesses I found on EBay will match the color scheme perfect. Just need to find or rig something to keep the harness straps from falling down. IMG_9935.jpeg
IMG_9936.jpeg
IMG_9942.jpeg
IMG_9941.jpeg
IMG_9940.jpeg
 

Karttekk

Well-known member
Messages
1,836
Reaction score
428
Location
Elizabeth, PA
The cvt is what makes the gy6 shine. Without the ctv, it would be a useless turd that wouldn't get out of its own way. There's alot to gain in tuning the cvt for the gy6. Weight is a big problem. I found it best to tune it for pulling weight, that's where the gy6 lacks power is low rpm torq. The stock 150 peaks torq at 6000 rpm, and that's only around 8 ft/lbs, so to get weight to move, you gotta stall the clutch around 4000, I prefer 4500 with 18" tires. Bigger tires makes things worse. You can control that with different roller weights, and clutch springs. Buggy gy6 engines do have 3 gear reductions. Some have a 3.??:1 trans gear, some have 2.??:1, I perfere the 3.??:1, the smallest trans output sprocket, and the largest axle sprocket that will fit, for pulling 2 200# adults. The mph will be there, you jus gotta get the rpm up in the power band. That's why so many used ones are worn out.
Ebay and Amazon both have good kits, I've used both, they work, most come with new oil pumps and chains. Jus don't fall for the big bore gimmick. Most 150 blocks don't accept the big bore cylinder. You have to split the block and have the block bored so the cylinder will fit down in to it. But now there's less material around the studs.
Theres a set of numbers on the left side of crankcase close to the bottom, near the front, these will tell you if it will accept the big bore kits. I don't think it's worth the aggravation.
I've used this top end kit from Go kart Supply. Worked well. Here's a video on how to do it.


subydrift

Member
Messages
42
Reaction score
68
Location
South Jordan, UT
Thanks Karttek!

And Denny, I found these harness inserts for the Rzr seats that allow you to run the harnesses through the seats. I ordered a pair last night and will get them cut in next week. Should be a good choice for the harnesses.

s-l300.jpg
 

subydrift

Member
Messages
42
Reaction score
68
Location
South Jordan, UT
Got a little more powder coating done this weekend and got all the body panels mounted, the pedals installed, and the lights wired up. I'm running a dedicated battery for the lights that will sit in a small box in front of the passenger feet. This way we won't ever over take the starting battery and the engine's charging system. I have a pigtail for a charger connector hanging outside of the box so it can be plugged in when parked. All the body panels have a rubber washer between them and the frame to prevent any rattling. Just a few more little things like the harness pass through and some front end adjustments before we shift focus to the engine.

IMG-9975.jpg


IMG-9976.jpg
 

subydrift

Member
Messages
42
Reaction score
68
Location
South Jordan, UT
Thanks guys! My son is stoked! He's always out there sitting in it and pretending to drive. Lol. I'm hoping next week I can get the engine back in with the new electrical and fire it up to see what we're working with.
 

subydrift

Member
Messages
42
Reaction score
68
Location
South Jordan, UT
I got the wiring for the lights all buttoned up and secured under the hood panel and I got the wiring harness ran up to the new ignition switch and kill switch. I got a new harness from SuperGY6 and the quality is stellar! Plus it comes with all new electrical components so I'm hoping that makes the reassembly easier. I have a separate 10 AH battery to run the lights with so I'm not straining the stator in the motor. We can recharge it with a battery tender when its parked. I'm going to get some rubber covers for the terminals and bolt a strap down to the floor to secure it. Here's a little pic dump of today's progress....

IMG-0034.jpg

IMG-0035.jpg


IMG-0036.jpg

IMG-0037.jpg


IMG-0038.jpg

IMG-0043.jpg
 

subydrift

Member
Messages
42
Reaction score
68
Location
South Jordan, UT
Little update, I got the harness bezel cut into the seats and it all looks and feels so much better! I ordered new clutch and variator assemblies from BDX Performance and then grabbed some 9 gram rollers and the 1500 rpm clutch springs off Amazon and lastly a new carb with performance jets from Go powersports. Hopefully those are the last pieces of the puzzle! I figure at this point worse case is I need to rebuild the top end of the motor but it feels like it has good compression so I'm gonna roll with it for now.

I did find a piece of the engine casting is broke off right above the cooling fan. I can't see it effecting any performance and I have the piece still so I'm gonna try to weld or JB weld it back in place to keep dirt and debris out of the stator area. I'll grab a pic for reference and any input on how to fix that would be helpful.

Should be powder coating the wheels this weekend and then she'll be rolling again!
 

BrownStainRacing

Well-known member
Messages
1,366
Reaction score
1,353
Little update, I got the harness bezel cut into the seats and it all looks and feels so much better! I ordered new clutch and variator assemblies from BDX Performance and then grabbed some 9 gram rollers and the 1500 rpm clutch springs off Amazon and lastly a new carb with performance jets from Go powersports. Hopefully those are the last pieces of the puzzle! I figure at this point worse case is I need to rebuild the top end of the motor but it feels like it has good compression so I'm gonna roll with it for now.

I did find a piece of the engine casting is broke off right above the cooling fan. I can't see it effecting any performance and I have the piece still so I'm gonna try to weld or JB weld it back in place to keep dirt and debris out of the stator area. I'll grab a pic for reference and any input on how to fix that would be helpful.

Should be powder coating the wheels this weekend and then she'll be rolling again!
On those engines, the valve lash will tighten up with age. They can be picky lil sucka's. Save yourself some time and frustration and set em now. I set em at .004" on both.

Lapping the valves for a good seal wouldn't hurt, but those automotive style keepers/locks, makes it a pain without a small engine valve spring compresser.
 

subydrift

Member
Messages
42
Reaction score
68
Location
South Jordan, UT
On those engines, the valve lash will tighten up with age. They can be picky lil sucka's. Save yourself some time and frustration and set em now. I set em at .004" on both.

Lapping the valves for a good seal wouldn't hurt, but those automotive style keepers/locks, makes it a pain without a small engine valve spring compresser.
I was talking to a buddy today about it and he convinced me to just do the rebuild since it’s out. Seems silly to do all the work we have and then chance out on the most important part of the kart. I think I’m gonna order the rebuild kit from gotbuggies.com.
 

BrownStainRacing

Well-known member
Messages
1,366
Reaction score
1,353
I was talking to a buddy today about it and he convinced me to just do the rebuild since it’s out. Seems silly to do all the work we have and then chance out on the most important part of the kart. I think I’m gonna order the rebuild kit from gotbuggies.com.
👍 I totally agree. I've seen more bad used one's, then good used one's.

I hope you get the kit that comes with the complete head. It's makes things more simple also. No worries about leaky valves and seats. These lil engines need all the help they can get.
 

subydrift

Member
Messages
42
Reaction score
68
Location
South Jordan, UT
Here's the kit I think I'm gonna go with. Seems to have everything I need, plus if I run into trouble I can call JD at Got Buggies and get some support. Just need to figure out which exhaust studs I need and I'll get some new ones installed in the new head.


subydrift

Member
Messages
42
Reaction score
68
Location
South Jordan, UT
So I started tearing apart the cvt side of things today and found a ton of what looked like oil in the cvt case? It may have just been belt and clutch dust mixed with moisture but it isn’t pretty. Lol. The clutch has a bunch of rust on it so I’m glad I ordered a new one. I did find out however that the cvt output shaft is bent. Not sure if it’s enough to throw the chain but it is definitely bent. Luckily they are cheap on Amazon but it sounds like I’ll be tearing apart the gear case too.

Any tips or advice on any other parts to check or replace while I’m in there??

IMG_0180.jpeg
IMG_0181.jpeg
 
Top